|
Step
|
Action
|
Description
|
|
1
|
Edit /etc/hosts file |
A simple Named Services system is created in the following manner:
- The new domain server will be on system 192.168.21.37 which is called utility.
- The following /etc/host file has been edit to contain all the DNS entries that are required:
127.0.0.1       localhost
192.168.21.37    utility utility.mydomain.com   loghost
192.168.21.8     kadence kadence.mydomain.com
192.168.21.25    www     www.mydomain.com       myeb
192.168.21.26    mydev   mydev.mydomain.com
192.168.21.32    mytest2-admin mytest2-admin.mydomain.com
192.168.21.33    myv20z  myv20z.mydomain.com
192.168.21.34    myt1    myt1.mydomain.com
192.168.21.35    mytest  mytest.mydomain.com
192.168.21.36    rlogic  rlogic.mydomain.com
192.168.21.41    aix43p  aix43p.mydomain.com
|
- Assume domain name is to be mydomain.com.
- Assume network is 192.168.21.
- Create a domain run directory to contain the Named services files called /var/named.
- Place the h2./n script is this directory.
- Run the h2n script file as follows:
|
| 2 |
#mkdir -p /var/named |
- Create a domain run directory to contain the Named services files called /var/named.
- Place the h2n script is this directory from the untar gzip directory of h2n-2.56. See Prerequisite above.
#mkdir -p /var/named

#cp <from the ./h2n-2.56 directory>/h2n /var/named
|
|
| 3 |
# h2n -d <domain name> -n <network> -u <email> |
| |
Run the h2n script file as follows:
bash-3.00#cd /var
bash-3.00#mkdir named
bash-3.00#cp h2n named
bash-3.00#cd named
bash-3.00#./h2n -d mydomain.com -n 192.168.21 -u mbarto@mydomain.com
Initializing new database files...
Reading host file `/etc/hosts'...
Line 28: Skipping; IP not within range specified by -n/-a options.
> 127.0.0.1     localhost
Writing database files...
Generating boot and conf files...
Checking NS, MX, and other RRs for various improprieties...
Done.
bash-3.00# ls
boot.cacheonly  db.127.0.0      h2n             named.conf
conf.cacheonly  db.192.168.21   db.mydomain     named.boot
|
|
| 4 |
Obtain and copy
db.cache files.
|
The named server needs to know where servers for root zones are. This information is in the file db.cache. This file must be added to the /var/named directory for the Solaris 10 DNS server to work. This file is obtained from the web. To create a db.cache file, the information must be retrieved from the Internet host ftp.rs.internic.net (198.41.0.6). Use either ftp or a web browser to locate and download a file called named.root located in the domain directory.
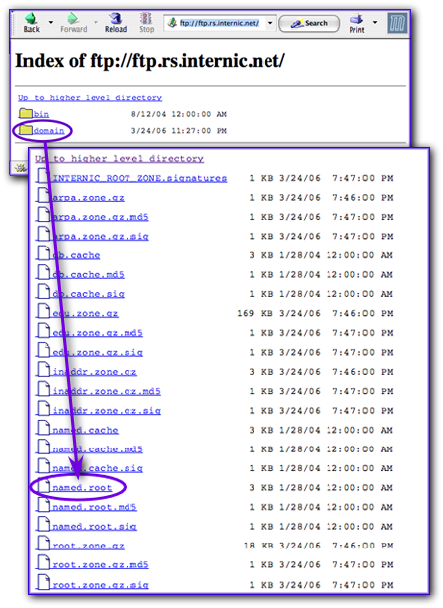
After downloading the named.root file. Simply rename the file to db.cache and copy to the /var/named directory.
bash-3.00# ls
boot.cacheonly  db.127.0.0    db.cache     h2n          named.conf
conf.cacheonly  db.192.168.21 db.mydomain  named.boot
bash-3.00#
|
|
| 5 |
# cp named.conf /etc |
Copy the configuration file to the /etc directory. |
| 6 |
Setup Network |
| 6a |
Edit
/etc/nsswitch.conf |
Edit the file /etc/nsswitch.conf and add the entry dns to the host entry as follows:
|
#
# /etc/nsswitch.files:
#
# An example file that could be copied over to /etc/nsswitch.conf; it
# does not use any naming service.
#
# "hosts:" and "services:" in this file are used only if the
# /etc/netconfig file has a "-" for nametoaddr_libs of "inet" transports.
passwd:     files
group:      files
hosts:      files	dns
networks:   files
protocols:  files
:          :          :          :          :          :
:          :          :          :          :          :
|
The entry above means that for name resolution, the system will first look at the local /etc/hosts file and then use the dns server which in this case is itself.
|
| 6b |
Create/Edit
/etc/defaultdomain
and
Set domain
|
Create or edit a file called /etc/defaultdomain and add the single entry:
#vi /etc/defaultdomain
mydomain.com
|
Execute the domainname command to set the domain as follows:
#domainname `cat /etc/defaultdomain`
|
|
| 6c |
Edit
/etc/resolv.conf |
For the /etc/resolv.conf file the following entries need to be established. This first is the name of the domain (e.g. mydomain.com) that was assigned with the h2n script. The second is the nameserver address of the system maintaining that domain assigned lists (e.g. nameserver 192.168.21.37) of the domain:
#vi /etc/resolv.conf
nameserver      12.11.108.15
nameserver      12.11.108.16
domain mydomain.com
nameserver      192.168.21.37
|
|
| 7 |
Start Named Services |
Named services can be started by issuing the command:
Note: This assumes that in Solaris 10 a service configuration repository has been enabled to run. To enabled the respository use
- svcs - report service status
- svcadm - manipulate service instances
bash-3.00# svcs -a | grep dns
disabled         10:15:21 svc:/network/dns/server:default
disabled         10:15:22 svc:/network/dns/client:default
bash-3.00# svcadm enable /network/dns/server
bash-3.00# svcs -a | grep dns
online           10:15:21 svc:/network/dns/server:default
online           10:15:22 svc:/network/dns/client:default
|
/network/dns/server must be online for DNS to run properly and initiate if the DNS server is rebooted.
|
| 8 |
Configurating Clients to use DNS |
To use DNS, clients need to modify the /etc/resolv.conf, and /etc/nsswitch.conf as above. The /etc/defaultdomain file must also be created and establsihed as above. |
